Press Enter or Space to expand or collapse and use down arrow to navigate to the tab content
close menuopen menu
Click to read more about this recipe
Includes
Your webbrowser is outdated and no longer supported by Microsoft Windows. Please update to a newer browser by downloading one of these free alternatives.
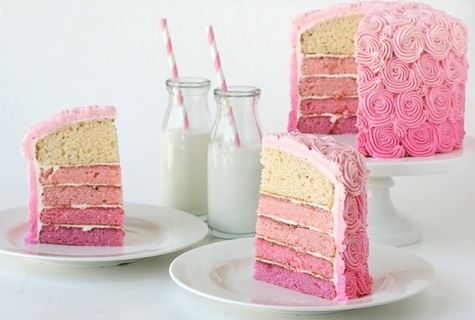
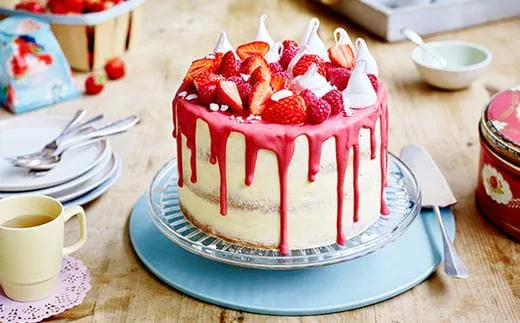
Ombre Cake
This showstopper Ombre cake is one to wow friends and family and tastes delicious too!
This showstopper Ombre cake is one to wow friends and family and tastes delicious too!
Place the Stork and caster sugar in a mixing bowl and cream together with a wooden spoon (or whizz together in a mixer if you have one) until smooth.
Crack the eggs into a bowl and break them up quickly with a fork. Then tip into the Stork and sugar mixture and mix together.
Add the self-raising flour no need to sieve and mix again until everything is smooth. Use a rubber spatula or a spoon to collect any flour that has stuck to the sides of the bowl and mix that in too.
Find 4 medium-size mixing bowls and place them on the counter top next to your cake mixture. You are going to divide the mixture evenly between the bowls, but don't panic! This is easy to do by using a large serving spoon and taking a large dollop of cake mixture and placing one dollop in each bowl in turn. Count as you go, making sure that each bowl has an equal number of spoonfuls of mixture.
Now we need to colour the sponge. We are going to start very cautiously, and use the end of teaspoon to dig out a small amount of food colouring to mix to the very first of our batches of cake mix. Just one little amount will do. Mix it in evenly and set this bowl aside.
Moving on to the next batch of cake mix, this time add two amounts of cake mix and mix in thoroughly. Then add three amounts to the third and four to the fourth.
By this time you should have four mixes ranging from palest pink to deep pink. Take a good look at your batches. Do you have a good progression of colour? The colour of the sponges will deepen as they bake. With this in mind, add some extra colouring if needed.
Place a greaseproof circle in each tin and scrape your cake mix into each tin.
Place the tins in the centre of a pre-heated oven at 150 degrees for 30 minutes.
You will know when the cakes are fully cooked because they will spring back into shape when prodded in the centre. If they don't appear to be done, don't worry about the cakes flopping, they won't, just close the oven door and check back in five minutes to see how they are getting on.
Turn your cakes out onto a wire rack, peel of the greaseproof circles, and allow them to cool fully before icing.
Prepare you cakes for icing by trimming off the domes with a bread knife so they are nice and flat.
Make your icing by softening the Stork in the microwave and beating in the icing sugar with a wooden spoon until smooth. (If you want to really go to town, you could beat in a tiny amount of the pink food colouring to get a soft pastel pink icing).
Take the darkest sponge and, using a palette knife, spread a little of your icing on top about 5mm thickness would be perfect.
Find the next darkest sponge and spread a little seedless raspberry jam on the surface, then lay it, jam-side down, on top of the icing.
Continue to stack the cake in this way until all of sponges are used and the cake is assembled.
Take your remaining icing and spread a good thick layer on the top of the cake and, if you're feeling decadent, you could put it all over the sides of the cake too!